How to Set Up Plex to Use a Nginx Reverse Proxy
I have set up my Plex to use a Nginx reverse proxy. By doing so, I have simplified the connection to my network services that are running on my server. I can now access my Plex installation simply by connecting to my server, just as I would do when connecting to any website.

Instead of accessing my Plex server using port 32400, with Nginx I can access Plex as I would connecting to any website - by using a custom domain for Plex. This means that I don't need to expose the standard Plex port 32400 from my server. Reducing how many ports that are exposed from my server reduces the attack surface if someone were to gain access to my network.
It was surprising easy to set up Plex to use a Nginx reverse proxy on my local network. I will describe what I did in the sections below.
Keep in mind that I am using Windows, however, the steps outlined below should apply to any operating system supported by Plex.
Required software for Plex to use a Nginx reverse proxy
There isn't much that is required to set up Plex to use a Nginx reverse proxy. The good news is that all software is free, so anyone can set up Plex is this manner.
The software required is:
- Nginx
- The Nginx application is an open-source web server, load balancer and also a reverse proxy. The installation for Nginx is dependent on the operating system you are using. For my Windows server, I downloaded the zip file and extracted the file to a location on my server.
Additional requirements
A good additional requirement to have is your own custom domain name. With a domain name you can then create a subdomain, such as plex.mydomain.com that you can use for your Plex instance. By using a subdomain, you can then use the same domain with other subdomains for different services on your local network.
In the steps below, I will use plex.mydomain.com, so you would just change that subdomain to whatever you choose.
Set up Nginx reverse proxy
Once Nginx is installed/extracted on your Plex Media server, you will now configure Nginx to manage all requests to your Plex installation.
The following steps explain how to configure Nginx to handle requests to the Plex server. This will allow you to provide custom server access URLs to your Plex server. In this case, the domain plex.mydomain.com is used to access Plex.
- Access the server and then navigate to the folder where Nginx was extracted. In the folder, navigate to the conf folder.
- Open the nginx.conf file in a text editor.
- Add the following text to that file. Replace plex.mydomain.com with the subdomain you wish to use to access your Plex server.
http { server { listen 80; server_name plex.mydomain.com; set $plex http://127.0.0.1:32400; gzip on; gzip_vary on; gzip_min_length 1000; gzip_proxied any; gzip_types text/plain text/css text/xml application/xml text/javascript application/x-javascript image/svg+xml; gzip_disable "MSIE [1-6]\."; # Forward real ip and host to Plex proxy_set_header Host $host; proxy_set_header X-Real-IP $remote_addr; #When using ngx_http_realip_module change $proxy_add_x_forwarded_for to '$http_x_forwarded_for,$realip_remote_addr' proxy_set_header X-Forwarded-For $proxy_add_x_forwarded_for; proxy_set_header X-Forwarded-Proto $scheme; proxy_set_header Sec-WebSocket-Extensions $http_sec_websocket_extensions; proxy_set_header Sec-WebSocket-Key $http_sec_websocket_key; proxy_set_header Sec-WebSocket-Version $http_sec_websocket_version; # Websockets proxy_http_version 1.1; proxy_set_header Upgrade $http_upgrade; proxy_set_header Connection "Upgrade"; # Buffering off send to the client as soon as the data is received from Plex. proxy_redirect off; proxy_buffering off; location / { proxy_pass $plex; } } } - Once the nginx.conf file has been changed, start the Nginx server.
- If no errors occur, you should be able to open Web browser and navigate to the subdomain you chose for your Plex server. The Plex web interface should be displayed.
The next step is to have all your Plex clients use the reverse proxy to connect to your Plex Media server.
To do that, follow the steps in the Allow Plex clients to use the reverse proxy section below.
The next section will show how to setup a secure proxy connection to your Plex server.
Enabling HTTPS for Plex using a reverse proxy
If you wish to use a certificate - such as one from Let's Encrypt - for the subdomain you use to connect with Plex, then you can use the following steps:
- Generate a certificate for your subdomain. The process of doing so is outside the scope of this guide.
- Access the server and then navigate to the folder where Nginx was extracted. In the folder, navigate to the conf folder.
- Open the nginx.conf file in a text editor.
- Add the following text to that file. Replace plex.mydomain.com with the subdomain you wish to use to access your Plex server.
http { server { listen 80; server_name plex.mydomain.com; return 301 https://$http_host$request_uri; } server { listen 443 ssl http2; server_name plex.mydomain.com; # path to fullchain.pem on local machine ssl_certificate [path to fullchain.pem]/fullchain.pem; # path to privkey.pem ssl_certificate_key [path to privkey.pem]/privkey.pem; set $plex https://127.0.0.1:32400; gzip on; gzip_vary on; gzip_min_length 1000; gzip_proxied any; gzip_types text/plain text/css text/xml application/xml text/javascript application/x-javascript image/svg+xml; gzip_disable "MSIE [1-6]\."; # Forward real ip and host to Plex proxy_set_header Host $host; proxy_set_header X-Real-IP $remote_addr; #When using ngx_http_realip_module change $proxy_add_x_forwarded_for to '$http_x_forwarded_for,$realip_remote_addr' proxy_set_header X-Forwarded-For $proxy_add_x_forwarded_for; proxy_set_header X-Forwarded-Proto $scheme; proxy_set_header Sec-WebSocket-Extensions $http_sec_websocket_extensions; proxy_set_header Sec-WebSocket-Key $http_sec_websocket_key; proxy_set_header Sec-WebSocket-Version $http_sec_websocket_version; # Websockets proxy_http_version 1.1; proxy_set_header Upgrade $http_upgrade; proxy_set_header Connection "Upgrade"; # Buffering off send to the client as soon as the data is received from Plex. proxy_redirect off; proxy_buffering off; location / { proxy_pass $plex; } } - Once the nginx.conf file has been changed, start the Nginx server.
- If no errors occur, you should be able to open Web browser and navigate to the subdomain using https. The Plex web interface should be displayed.
You may have noticed that the first server listed in the nginx config file uses port 80 and only contains a 301 redirect. This setting is used to automatically redirect all http requests to your subdomain to https so any connection to Plex through the proxy will use https.
Allow Plex clients to use the reverse proxy
At this point your reverse proxy should now be handling your Plex connections instead of going over Plex server port 32400 directly. The one issue is that all your Plex clients will still connect to Plex through port 32400, bypassing the reverse proxy.
To have the Plex clients use the reverse proxy, you need to make a simple change on the Plex server.
The following steps outline the change:
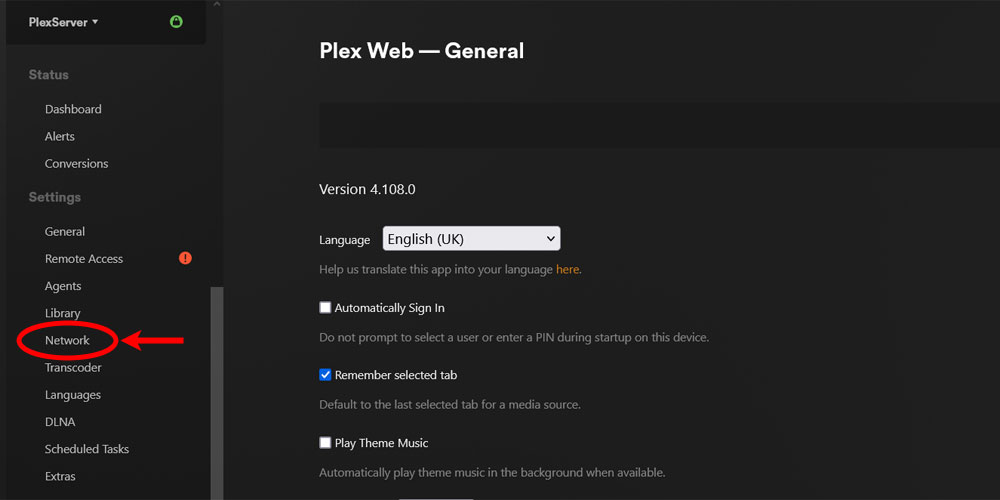
- Log into your Plex server as an administrator, and then click the Settings - the wrench - link in the upper-right corner of the Plex server page.

The 'Plex Settings' icon - From the menu on the left, click the Network option under the Settings section.

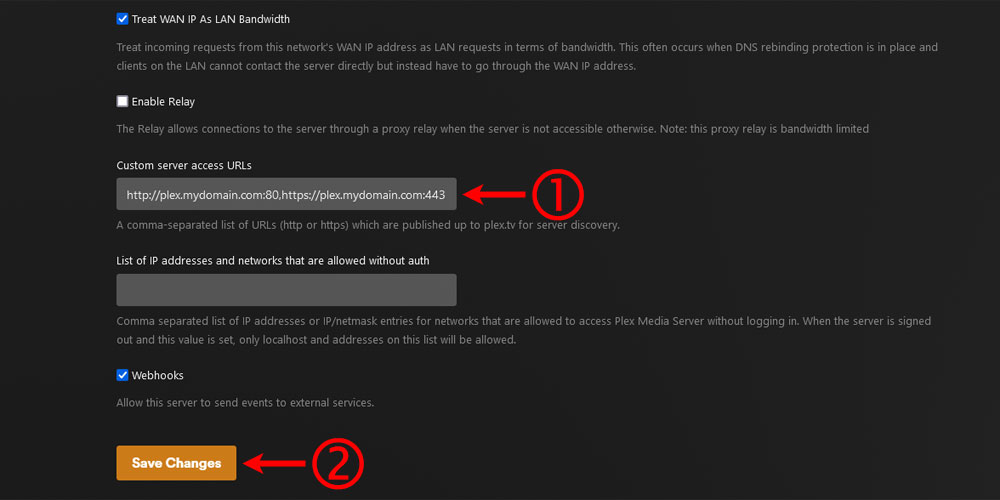
The 'Network' option in Plex - Scroll down the page and in the Custom server access URLs edit box you will enter the custom URLs separated by a comma:
http://plex.mydomain.com:80,http://plex.mydomain.com:443for both the unsecure and secure connections. If you only need one URL, then just enter the one you need. Click the Save Changes button to save the URLs.
The 'Custom server access URLs' option in Plex
This will register your subdomain as being a valid address for your Plex instance. The subdomain will then be used by your Plex clients when they try to discover your Plex server.
Since your clients can now discover your Plex instance on port 80 or 443, you can now block access to port 32400 on the server. This reduces the number of ports that are open on the server, which does help reduce the attack surface.
By using a custom domain and a subdomain to access Plex using a reverse proxy, this provides an easier and more secure way of accessing Plex from your local network or from another network.